Subversion is a free open source version control system used to manage files/directories and the changes of them made all time. It allows us to recover the older files/directories and examine the history of your files/directories how they are changed all over time.
Before installing SVN Server, we want root privilege.
Step 1 - Check the server details like OS and IP-Address.

Step 2 - Check the "Apache Server" (httpd) is installed on your server and port is pointed to IP-Address. If not, please install the Apache web server using "yum install httpd" command and restart httpd service.


#ServerName www.example.com:80
ServerName 192.168.1.2:80

Step 3 - Update your yum repository using the command as shown below.

Step 4 - Search SVN package availability in your repository and install SVN server.


Step 5 - To configure Subversion Server, Open the SVN config file "/etc/httpd/conf.d/subversion.conf" and add the following lines on the top of the file.

Step 6 - Now we want to create new users for Subversion called “shyam and kumar” for using SVN Server.
[root@proxy ~]# htpasswd -cm /etc/svn-auth-users shyam
[root@proxy ~]# htpasswd -m /etc/svn-auth-users kumar

Step 7 - Create and configure Subversion Repository. In my case I am creating a directory for subversion repository under ‘/var/www/’ directory.
[root@proxy ~]# mkdir /var/www/svn
[root@proxy ~]# cd /var/www/svn/
[root@proxy svn]# svnadmin create shyam_repo
[root@proxy svn]# chown -R apache.apache shyam_repo/

Step 8 - If you enabled SELinux, run the following commands to change the SELinux context security.
[root@proxy svn]# chcon -R -t httpd_sys_content_t /var/www/svn/shyam_repo/
[root@proxy svn]# chcon -R -t httpd_sys_rw_content_t /var/www/svn/shyam_repo/
Step 9 - Make sure that you have opened the Apache default port ’80’ through iptables. Open firewall configuration file and add this lines :
-A INPUT -p udp -m state --state NEW --dport 80 -j ACCEPT
-A INPUT -p tcp -m state --state NEW --dport 80 -j ACCEPT


Step 10 - After all, restart Apache service.

Step 11 - Now, test Subversion on browser, enter the following URL http://ip-address/svn/shyam_repo in the address bar.
Enter the username and password of Subversion user, which you have created earlier.


[root@proxy ~]# vim /var/www/svn/shyam_repo/conf/svnserve.conf
anon-access = none => Uncomment and Change to 'none'.
authz-db = authz => Uncomment to enable acess control

Step 13 - Create additional links(directories) under Subversion. Create some directories in any place and import them to your Subversion repository (Trunk, Branches, Tag).
[root@proxy ~]# mkdir -p /svn-templates/{trunk,branches,tags}
OR
[root@proxy ~]# mkdir svn-templates
[root@proxy ~]# cd svn-templates/
[root@proxy svn-templates]# mkdir trunk
[root@proxy svn-templates]# mkdir branches
[root@proxy svn-templates]# mkdir tags

Step 14 - Now import the sub directories using the command "svn import".
[root@proxy ~]# svn import -m 'Initial import' /root/svn-templates/ http://192.168.0.219/svn/shyam_repo/

Step 15 - Now check for the changes in your repository. Open browser and enter the url http://192.168.0.219/svn/shyam_repo/
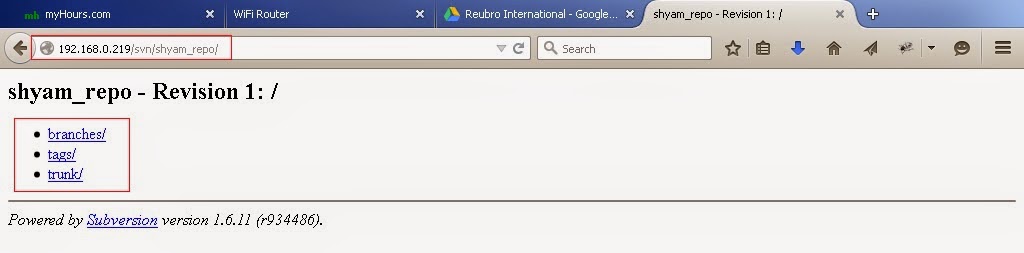
That's it...
No comments:
Post a Comment